Bypassing Android SSL Certificate Pinning with Frida
When analysing an Android application’s network traffic — whether for security auditing, API reverse engineering, or penetration testing — the first obstacle you will almost always face is SSL/TLS certificate pinning. Certificate pinning is a defence mechanism that tells the app to only trust a specific set of certificates (or public keys) beyond the system’s default trust store. In practice, this means that even if you install your own CA certificate on the device and set up a proxy like mitmproxy, the app will flat-out refuse to communicate through it. The TLS handshake fails, the connection is dropped, and you see nothing.
This is where Frida comes in. Frida is a dynamic instrumentation toolkit that lets you inject JavaScript snippets into running processes — on Android, iOS, Windows, macOS, and Linux — and hook arbitrary functions at runtime. By hooking the certificate validation functions that an app calls during its TLS handshake, we can make them always return “this certificate is fine” and effectively neutralise certificate pinning.
In this article we will:
- Understand what SSL pinning is and how Android apps implement it
- Set up Frida on a rooted Android device
- Set up mitmproxy as our interception proxy
- Use a universal SSL unpinning script to bypass certificate pinning
- Demonstrate the full process against a real application
The goal: by the end of this article, you will be able to intercept and inspect HTTPS traffic from any Android app, regardless of its certificate pinning implementation.
What is SSL Certificate Pinning?
In a standard TLS connection, the client verifies the server’s certificate against the system’s trusted Certificate Authority (CA) store. This is sufficient for most cases — your browser trusts Let’s Encrypt, DigiCert, etc. because their root certificates are pre-installed in your OS.
Certificate pinning adds a second layer of verification: the app hardcodes (or “pins”) the expected certificate or public key, and compares it against what the server actually presents. If they do not match — even if the certificate is technically valid and signed by a trusted CA — the connection is rejected.
Why apps use it
The primary threat that certificate pinning mitigates is a Man-in-the-Middle (MitM) attack. Without pinning, anyone who can install a CA certificate on your device (e.g. a corporate network admin, a malicious app, or an attacker with physical access) can intercept and decrypt all HTTPS traffic. With pinning, this becomes significantly harder because the attacker’s proxy certificate will not match the pinned expectation.
How Android apps implement it
There are several ways an Android app can implement certificate pinning:
- Network Security Config (XML, Android 7+) — Declarative pinning via
res/xml/network_security_config.xml - OkHttp CertificatePinner (Java, OkHttp library) — Programmatic pinning via
okhttp3.CertificatePinner - Custom TrustManager (Java) — App implements its own
X509TrustManager - SSLContext customisation (Java) — App replaces the default
SSLContextwith custom verification - Conscrypt TrustManagerImpl (Java, Android runtime) — Hooking into Android’s built-in cert verification
- Native SSL verification (Native C/C++) — App uses native libraries (OpenSSL/BoringSSL) directly via JNI
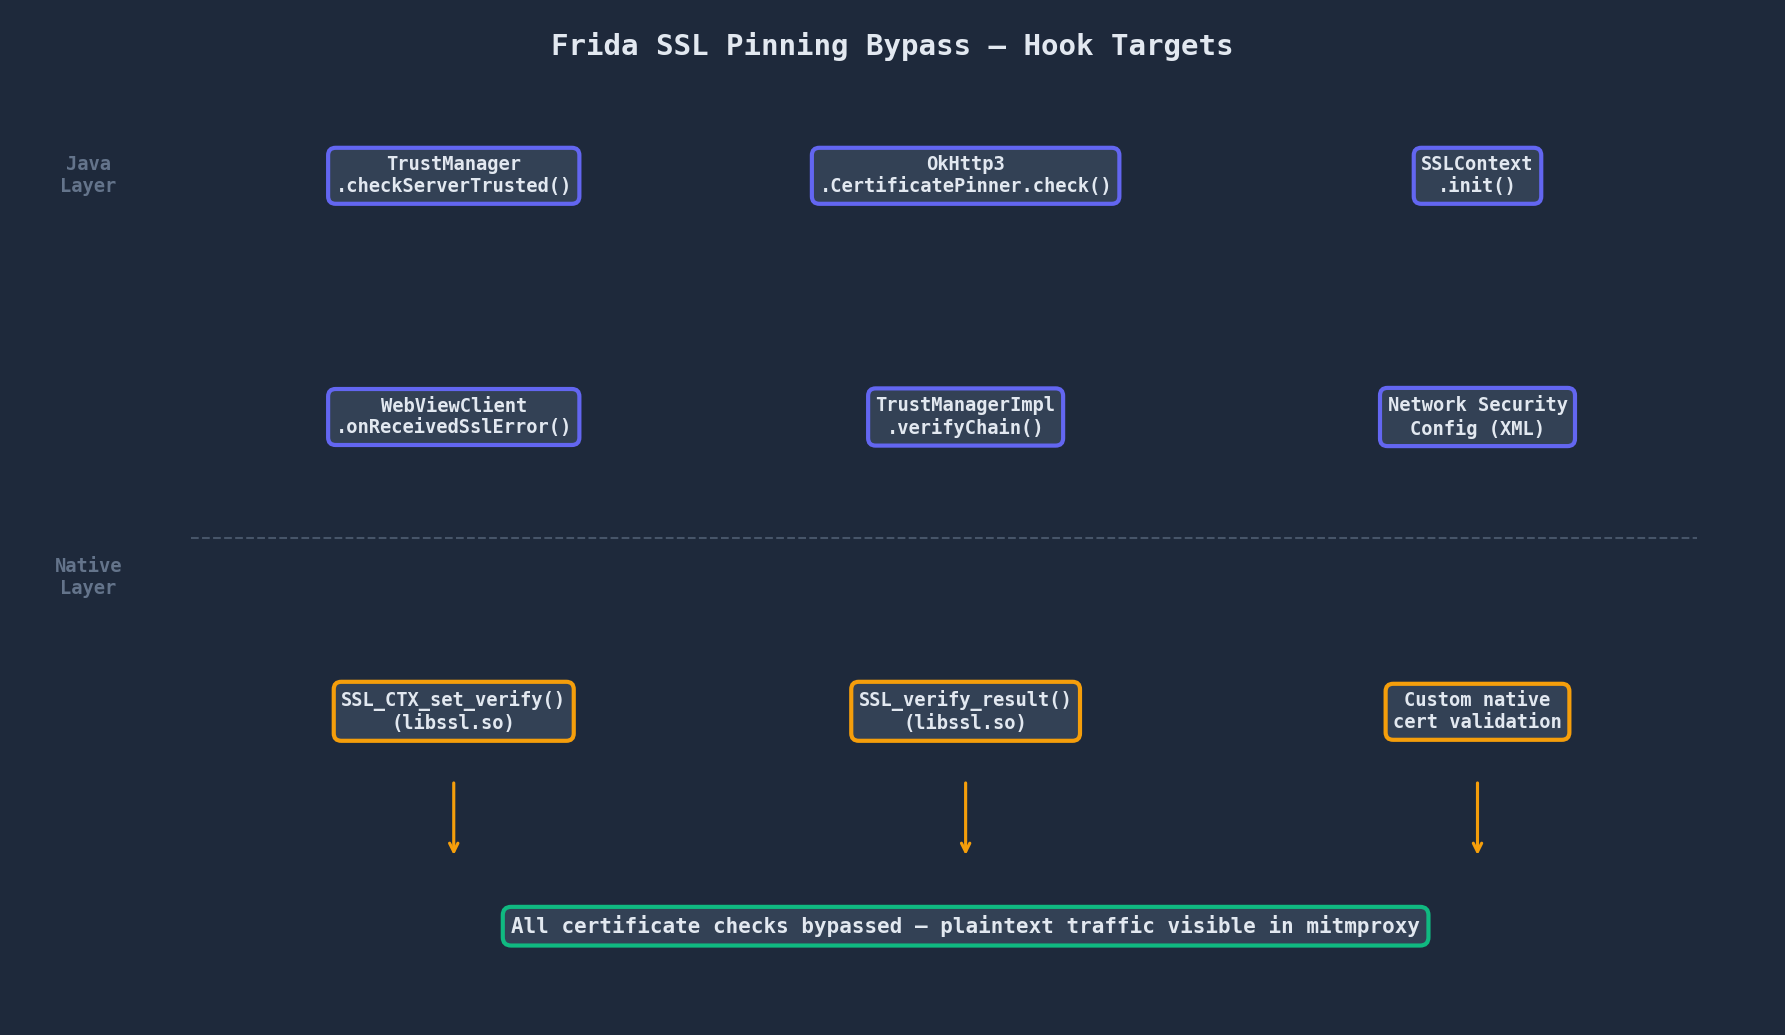
A robust bypass needs to target all of these layers. This is why we use a universal unpinning script rather than writing individual hooks for each app.
Architecture Overview
Here is what the full bypass setup looks like:
The flow is as follows:
        Android Device (rooted)
    ┌──────────────────────────┐
    │ Target App               │
    │    │ HTTPS via proxy     │
    │    v                     │
    │ mitmproxy (workstation)  │
    │    │ TLS handshake       │
    │    v                     │
    │ Frida hooks:             │
    │   .checkServerTrusted()  │
    │   .CertificatePinner()   │
    │   → returns "valid"      │
    │                          │
    │ frida-server (root)      │
    └──────────────────────────┘
                 │
                 │ HTTPS re-encrypted
                 v
          Remote Server
       (api.example.com)
Key components:
- frida-server: A small binary running as root on the Android device. It exposes a communication channel that the Frida client on your workstation connects to via USB (or WiFi).
- Frida client (your workstation): The CLI tools (
frida,frida-ps,frida-trace) or Python bindings that send JavaScript payloads to the device. - mitmproxy: An interactive HTTPS proxy running on your workstation. The device’s Wi-Fi is configured to route all traffic through it.
- Unpinning script: A JavaScript payload that Frida injects into the target app, hooking all relevant certificate verification methods.
Prerequisites
Before we begin, make sure you have the following:
On your workstation
- Python 3.8+ and
pip - adb (from the Android SDK Platform Tools)
- A USB cable to connect the Android device
On the Android device
- Rooted (via Magisk, KernelSU, or any other root method)
- USB Debugging enabled (Developer Options → USB Debugging)
- The target app installed
Note: Frida does technically work without root via repackaging the app with
frida-gadget, but that is outside the scope of this article. Here we assume a rooted device, which is the most straightforward approach.
Step-by-Step Walkthrough
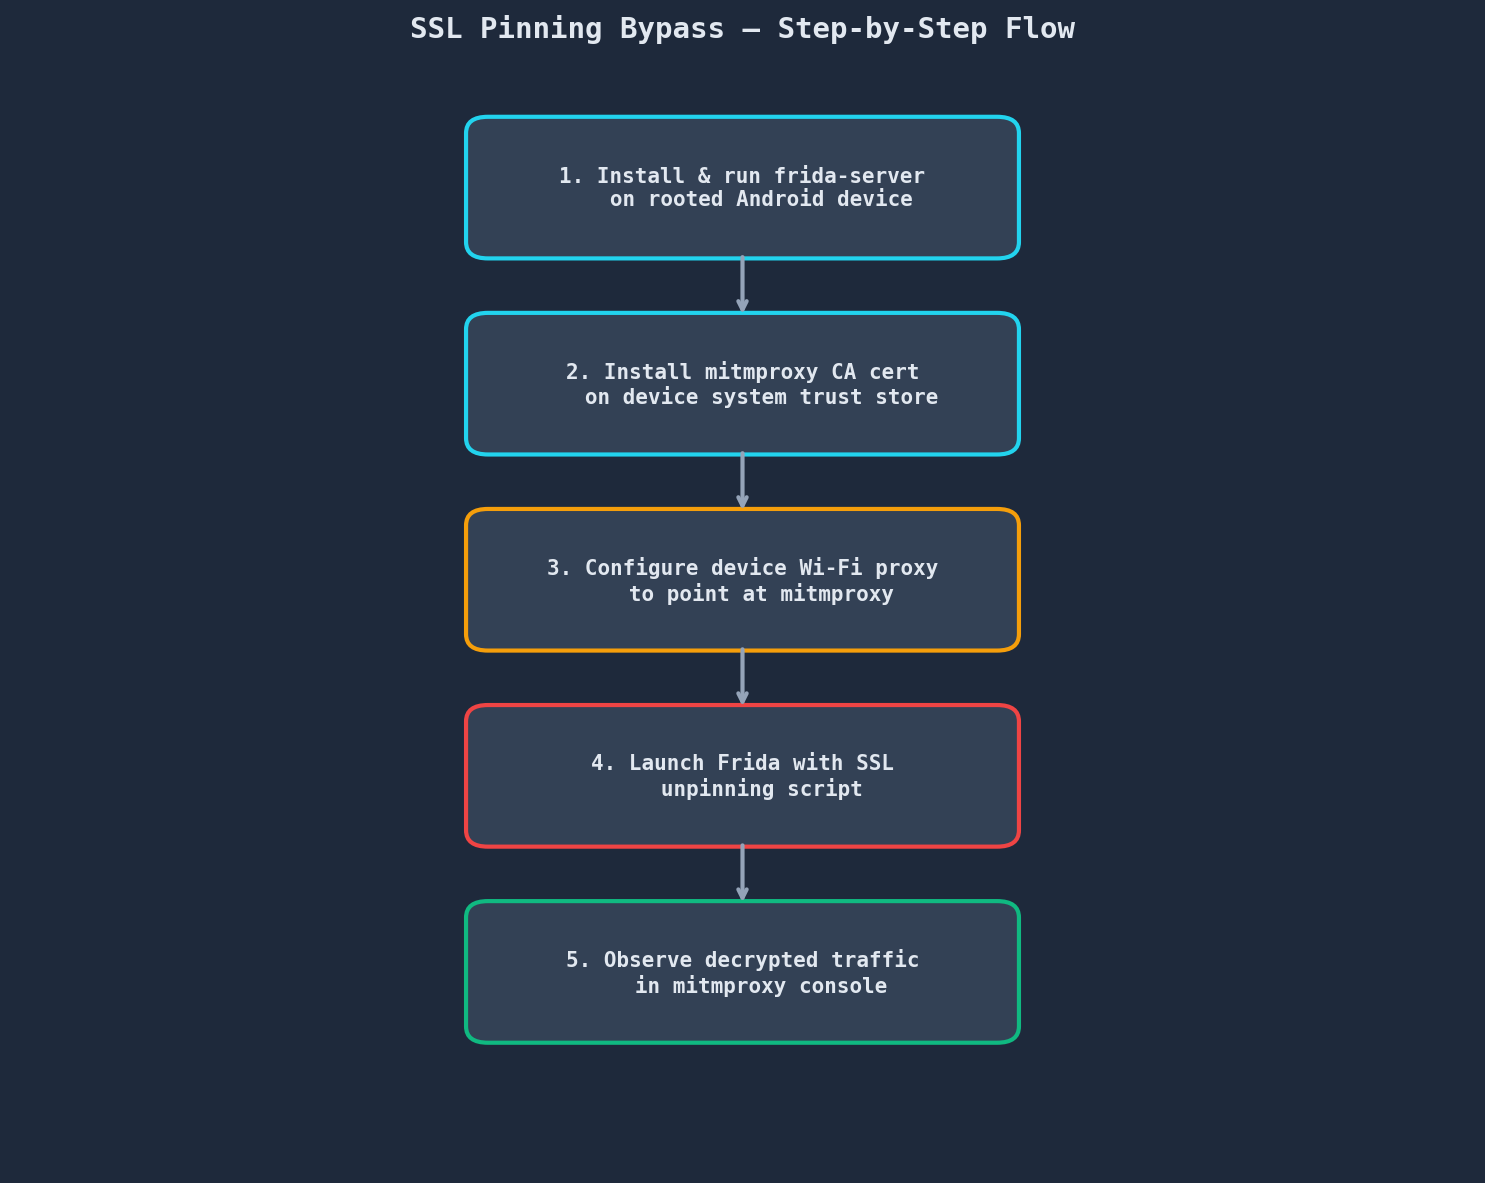
Step 1: Install Frida on your workstation
Install both the Frida Python bindings and the CLI tools:
$ pip install frida-tools frida
Verify the installation:
$ frida --version
17.9.1
Take note of the version — we need to download the matching frida-server for Android.
Step 2: Download and deploy frida-server
First, check your device’s CPU architecture:
$ adb shell getprop ro.product.cpu.abi
arm64-v8a
Then download the matching frida-server from the Frida releases page. Make sure the version matches what you installed on your workstation:
$ wget https://github.com/frida/frida/releases/download/17.9.1/frida-server-17.9.1-android-arm64.xz
$ unxz frida-server-17.9.1-android-arm64.xz
Push it to the device and set permissions:
$ adb push frida-server-17.9.1-android-arm64 /data/local/tmp/frida-server
$ adb shell "chmod 755 /data/local/tmp/frida-server"
Attention! Some apps can detect the frida-server binary by scanning common paths. You may want to rename it:
$ adb shell "mv /data/local/tmp/frida-server /data/local/tmp/fshelper"
Step 3: Run frida-server on the device
Launch frida-server as root:
$ adb root
$ adb shell "/data/local/tmp/frida-server &"
Or, if running on a production build where adb root does not work:
$ adb shell "su -c /data/local/tmp/frida-server &"
Verify the connection from your workstation:
$ frida-ps -U
PID  Name
---- -------------------------
1234 com.google.android.gms
1567 com.android.systemui
2345 com.android.launcher3
...
The -U flag tells Frida to connect to the USB-attached device. If you see a process list, everything is working correctly.
If you get an error like Failed to enumerate processes: unable to communicate with the remote frida-server, make sure:
- frida-server is actually running (
adb shell "ps -A | grep frida") - The versions match between client and server
- USB debugging is enabled and the device is authorised
Step 4: Install mitmproxy
On your workstation:
$ pip install mitmproxy
Verify:
$ mitmproxy --version
mitmproxy 11.x.x
Alternatively, if you prefer a GUI, you can download mitmproxy from mitmproxy.org, which includes mitmweb (a web-based interface).
Step 5: Install the mitmproxy CA certificate on the device
This is a critical step. mitmproxy generates its own CA certificate, and we need the device to trust it.
First, start mitmproxy once to generate the certificate, then stop it:
$ mitmproxy
# Press Ctrl+C immediately
The certificate is now at ~/.mitmproxy/mitmproxy-ca-cert.cer.
We need to install this as a system-level CA certificate on the Android device. On Android 7+ (API 24+), user-installed certificates are not trusted by apps by default — only system certs are. So we need to push it into the system trust store.
Method: via adb and root shell
$ adb push ~/.mitmproxy/mitmproxy-ca-cert.cer /sdcard/
$ adb shell
$ su
# Convert the certificate to the correct format
# (the filename must be the hash of the certificate subject)
# On your workstation first:
On your workstation, calculate the hash:
$ openssl x509 -inform PEM -subject_hash_old -in ~/.mitmproxy/mitmproxy-ca-cert.pem | head -1
c8750f0d
Then:
$ adb push ~/.mitmproxy/mitmproxy-ca-cert.pem /sdcard/c8750f0d.0
$ adb shell "su -c mount -o rw,remount /system"
$ adb shell "su -c cp /sdcard/c8750f0d.0 /system/etc/security/cacerts/"
$ adb shell "su -c chmod 644 /system/etc/security/cacerts/c8750f0d.0"
$ adb shell "su -c reboot"
Caveat: On devices running Android 10+ with system-as-root, remounting
/systemmay not be possible. In that case, use Magisk’s MagiskTrustUserCerts module, which moves user certificates into the system store via a Magisk overlay. Install it from the Magisk Modules repository, install the cert as a user certificate via Settings → Security → Install from storage, then reboot.
After rebooting, verify the certificate is installed:
Settings → Security → Encryption & credentials → Trusted credentials → System
You should see “mitmproxy” listed there.
Step 6: Configure the device proxy
Find your workstation’s IP address on the local network (e.g. 192.168.1.100).
On the Android device:
- Go to Settings → Wi-Fi
- Long-press the connected network → Modify network
- Expand Advanced options
- Set Proxy to Manual
- Set Proxy hostname to your workstation IP (e.g.
192.168.1.100) - Set Proxy port to
8080 - Save
Step 7: Start mitmproxy
On your workstation:
$ mitmproxy --listen-port 8080
Or for the web UI:
$ mitmweb --listen-port 8080
mitmproxy will start listening on port 8080. At this point, if you open any app that does not use certificate pinning, you should see its HTTPS requests appearing in the mitmproxy interface in plaintext.
For apps that do use pinning, the connections will fail — and that is exactly what we are about to fix.
Step 8: The universal SSL unpinning script
Now for the main event. We need a Frida script that hooks all common certificate verification methods. Rather than writing one from scratch, we will use a well-tested universal script.
The most comprehensive open-source option is the one from fdciabdul/Frida-Multiple-Bypass, which hooks:
javax.net.ssl.X509TrustManager(custom TrustManagers)javax.net.ssl.SSLContext.init()(SSL context initialisation)com.android.org.conscrypt.TrustManagerImpl(Android’s built-in trust manager)okhttp3.CertificatePinner.check()(OkHttp v3/v4 pinning)com.squareup.okhttp.CertificatePinner(OkHttp v2 pinning)android.webkit.WebViewClient.onReceivedSslError()(WebView errors)SSLPeerUnverifiedExceptionauto-patcher (catch-all for unknown implementations)- And many more (TrustKit, IBM WorkLight, Netty, Appmattus, etc.)
Download the script:
$ wget https://raw.githubusercontent.com/fdciabdul/Frida-Multiple-Bypass/main/bypass.js -O ssl_unpinning.js
Step 9: Inject the script into the target app
First, identify the target app’s package name:
$ frida-ps -Ua
PID  Name                          Identifier
---- ----------------------------- ----------------------------
8234 Twitter                       com.twitter.android
9102 Instagram                     com.instagram.android
7456 Some Target App               com.example.targetapp
The -Ua flag shows only running applications (as opposed to all processes).
Now inject the unpinning script:
$ frida -U -f com.example.targetapp -l ssl_unpinning.js --no-pause
The -f flag tells Frida to spawn the app (force-start it), which is important because we need to inject our hooks before the app initialises its SSL connections. The --no-pause flag tells Frida to resume execution immediately after injection.
You should see output like this:
[Local::com.example.targetapp]-> Unpinning Android app...
  --> Bypassing Trustmanager (Android < 7) request
[+] SSLContext
  --> Bypassing TrustManagerImpl checkTrusted
[+] TrustManagerImpl
  --> Bypassing OkHTTPv3 (list): api.example.com
[+] OkHTTPv3 (list)
  --> Bypassing OkHTTPv3 ($okhttp): cdn.example.com
[+] OkHTTPv3 ($okhttp)
[+] SSLPeerUnverifiedException auto-patcher
Unpinning setup completed
---
Each [+] line indicates a successfully installed hook. Each --> line shows a hook firing in real-time — meaning the app attempted to verify a certificate and our bypass intercepted it.
Step 10: Observe decrypted traffic in mitmproxy
With the hooks active, switch back to your mitmproxy terminal. You should now see the app’s HTTPS requests flowing through in plaintext:
GET https://api.example.com/v2/feed
    ← 200 OK application/json 4.2kB

POST https://api.example.com/v2/user/login
    ← 200 OK application/json 1.1kB

GET https://cdn.example.com/images/banner.png
    ← 200 OK image/png 245kB
You can now:
- Inspect request/response headers and bodies
- Extract API endpoints and parameters
- Analyse authentication tokens and cookies
- Save specific flows for documentation
Practical Demonstration: Analysing a Real App
Let us walk through a complete example using Twitter (now X) for Android — a well-known app that implements certificate pinning across all its API endpoints.
Setup recap
# Workstation (192.168.1.100)
$ mitmproxy --listen-port 8080 &
$ frida -U -f com.twitter.android -l ssl_unpinning.js --no-pause
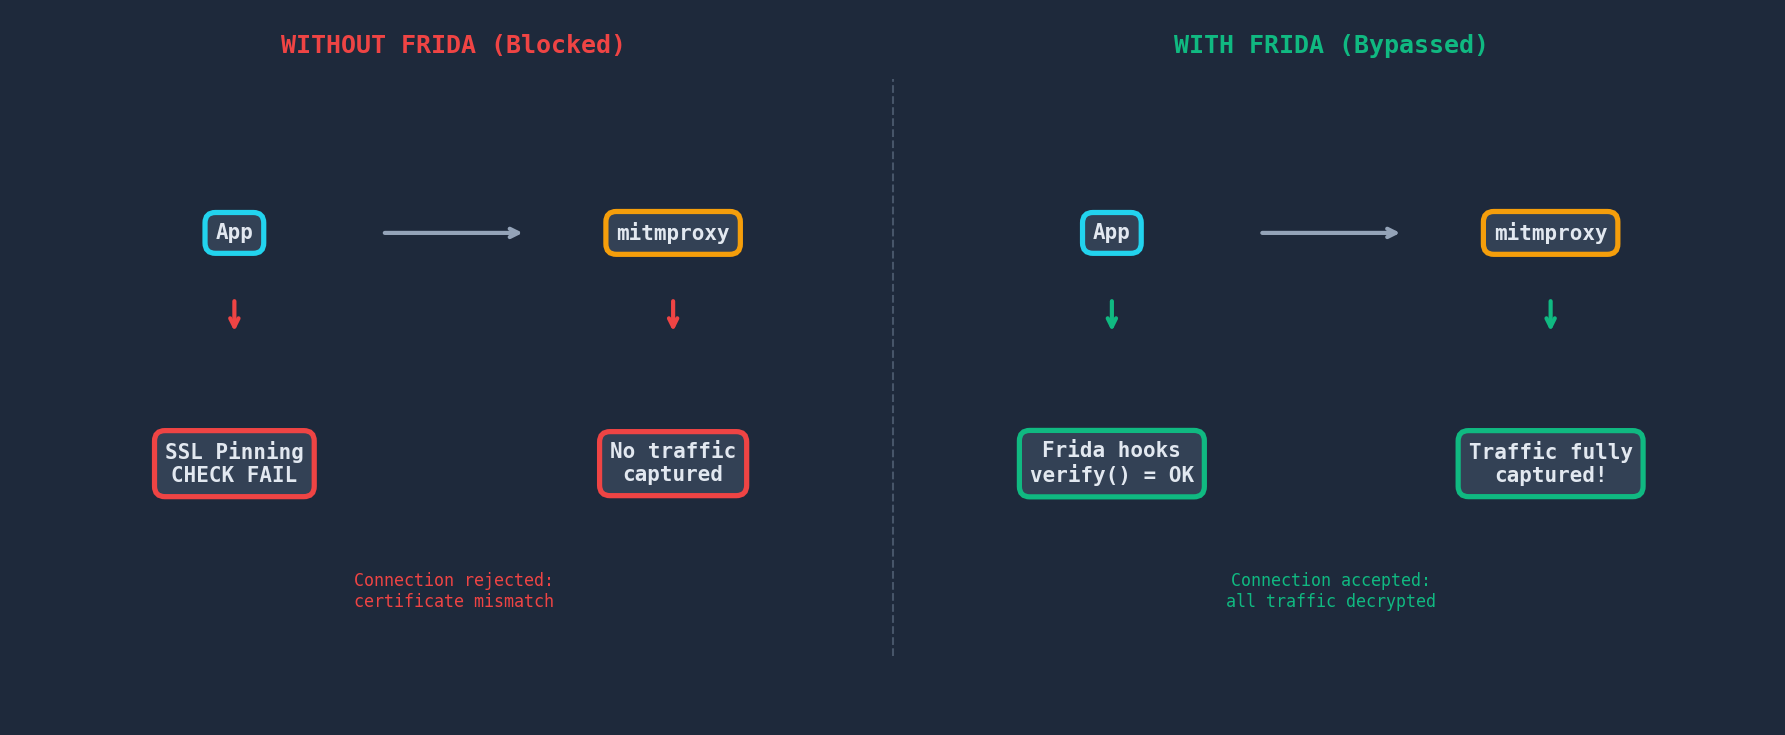
Without Frida (pinned)
When we open Twitter with the proxy configured but without the Frida script running, the app fails to load any content. mitmproxy shows no traffic, and we see errors like:
$ frida-ps -U | grep twitter
8234  com.twitter.android
The app is running, but all network requests fail silently because the certificate presented by mitmproxy does not match Twitter’s pinned certificate.
With Frida (bypassed)
Now inject the script:
$ frida -U -f com.twitter.android -l ssl_unpinning.js --no-pause

[Local::com.twitter.android]->
[*] Started upnpining...
[+] SSLContext
[+] TrustManagerImpl
  --> Bypassing OkHTTPv3 (list): api.x.com
[+] OkHTTPv3 (list)
  --> Bypassing OkHTTPv3 ($okhttp): api.x.com
[+] OkHTTPv3 ($okhttp)
[+] SSLPeerUnverifiedException auto-patcher
Unpinning setup completed
---
Twitter’s feed loads normally. Switching to mitmproxy:
GET https://api.x.com/2/timeline/home.json?count=20
  Cookie: auth_token=a1b2c3d4...; ct0=xYz123...
  ← 200 OK  [application/json]  128.4kB

GET https://api.x.com/2/users/show.json?screen_name=hunt_benito
  Authorization: Bearer AAAAAAAAAAAAAAAAAAAAANR...%2BQ
  ← 200 OK  [application/json]  3.2kB

POST https://api.x.com/2/timeline/ptr
  Content-Type: application/x-www-form-urlencoded
  ← 200 OK  [application/json]  45.6kB
We can now see every API call, including:
- The Bearer token used for API authentication
- The auth_token and ct0 cookies identifying the logged-in user
- The full request/response JSON payloads
- The API endpoint structure and parameters
This information is invaluable for understanding how the app communicates, reverse engineering its API, or identifying security issues in the authentication flow.
Advanced: Handling Native SSL Pinning
Some apps — particularly banking apps, DRM-protected apps, and heavily obfuscated applications — implement certificate verification at the native layer using C/C++ libraries (typically OpenSSL or BoringSSL via JNI). In these cases, the Java-level hooks may not be sufficient.
For these scenarios, we need to hook native functions. The key target is SSL_CTX_set_verify from libssl.so:
function bypassNativeSsl() {
    var sslVerify = Module.findExportByName("libssl.so", "SSL_CTX_set_verify");
    if (sslVerify !== null) {
        Interceptor.attach(sslVerify, {
            onEnter: function(args) {
                // mode = args[1].toInt32();
                // callback = args[2];
                // Replace the verification mode with 0 (disabled)
                args[1] = ptr(0);
                // Set callback to null
                args[2] = ptr(0);
                console.log("[+] Bypassed native SSL_CTX_set_verify");
            }
        });
    }
}
The full universal script from CYRUS-STUDIO/frida-ssl-pinning-bypass covers both Java and native layers comprehensively.
Another useful approach for native pinning is hooking SSL_read and SSL_write to capture plaintext data directly, bypassing the need for a proxy entirely. This technique is useful when the app uses certificate mutual authentication (client certificates) that cannot be easily bypassed.
Troubleshooting
frida-server crashes immediately
- Ensure the frida-server version matches your Frida client version exactly.
- Try running frida-server with
--verboseflag for error details. - Some custom ROMs have SELinux policies that block Frida. Try:
adb shell "su -c setenforce 0"
App crashes after injection
- Some apps implement Frida detection. Try renaming frida-server to a random name.
- Use
frida-serverwith--listenon a non-standard port. - Consider using Frida Gadget instead of frida-server for stealth.
Some hooks show [ ] instead of [+]
[ ]means the hook failed to install, usually because the target class does not exist in this particular app. This is normal — not every app uses every SSL library. As long as the relevant hooks for the target app’s SSL implementation are active ([+]), the bypass should work.
Traffic still not appearing in mitmproxy
- Verify the proxy is configured correctly on the device’s Wi-Fi settings.
- Some apps ignore the system proxy and make direct connections. In this case, use iptables to force-route all traffic through the proxy:
adb shell "su -c iptables -t nat -A OUTPUT -p tcp --dport 443 -j DNAT --to-destination 192.168.1.100:8080" - Make sure the mitmproxy CA certificate is installed in the system trust store, not just the user store.
App uses certificate mutual authentication (mTLS)
If the app presents a client certificate, mitmproxy needs access to it. You can extract it from the app’s APK or data directory, then configure mitmproxy with --set client_certs=/path/to/client.p12.
Ethical Considerations and Responsible Use
The techniques described in this article are standard tools for security researchers, penetration testers, and developers. However, it is important to remember:
- Only test applications you own or have explicit permission to test.
- Intercepting traffic from applications you do not own may violate terms of service and/or local laws.
- The information extracted (API keys, auth tokens, user data) should be handled responsibly and never disclosed without authorisation.
- Always report vulnerabilities you discover through the appropriate responsible disclosure channels.
SOURCES
Frida: https://frida.re/
Frida GitHub: https://github.com/frida/frida
Frida Android Documentation: https://frida.re/docs/android/
Frida frida-ps Documentation: https://frida.re/docs/frida-ps/
mitmproxy: https://mitmproxy.org/
Frida-Multiple-Bypass (universal unpinning script): https://github.com/fdciabdul/Frida-Multiple-Bypass
frida-ssl-pinning-bypass (Java + Native bypass): https://github.com/CYRUS-STUDIO/frida-ssl-pinning-bypass
Android Network Security Configuration: https://developer.android.com/privacy-and-security/security-config
OkHttp Certificate Pinning: https://square.github.io/okhttp/features/https/#certificate-pinning-kt
Frida Gadget: https://frida.re/docs/gadget/
MagiskTrustUserCerts Module: https://github.com/NVISOsecurity/MagiskTrustUserCerts