Getting Deeper with UDS: Automotive Diagnostics on Linux
Introduction
In the first article of this series, we got a Linux machine talking raw CAN frames to a vehicle: SocketCAN, a cheap CANable adapter, candump, and a Python script to sniff and inject frames. That is the networking layer sorted - the equivalent of getting Wireshark working on a LAN. But if you have ever stared at a candump trace of a busy vehicle bus, you will have noticed that most of the interesting traffic - the conversations between a diagnostic tester and an Electronic Control Unit (ECU) - does not happen in single 8-byte frames. It happens through a structured, request-response protocol layered on top of CAN.
That protocol is UDS - Unified Diagnostic Services, defined by ISO 14229. It is the lingua franca of modern automotive diagnostics: the protocol your dealership’s scan tool speaks, the protocol firmware-update tools use to flash ECUs, and - from a security research perspective - the protocol that guards the most powerful functionality in the vehicle, from reading raw ECU memory to rewriting firmware.
This article is the practical continuation of the series. We promised security-level authentication, and to get there we first need to master the protocol that carries it. We will cover:
- How UDS relates to CAN, OBD2 and the ISO-TP transport layer (ISO 15765-2)
- The anatomy of UDS services: requests, responses, sessions, and negative response codes
- Diagnostic sessions and the S3 timeout - the first gate
- Reading data by identifier and (with sufficient privileges) by memory address
- Security access (service 0x27) - the seed-key handshake that unlocks restricted functions, including its anti-brute-force mechanics
- A reusable, hardware-free lab: udscope, the open-source toolkit that accompanies this series, and its virtual ECU simulator
Everything in this article is reproducible on any Linux machine with no vehicle and no CAN hardware - we run a virtual CAN interface and a simulated ECU that implements the security behaviours you will meet on real hardware. Where you eventually point these tools at a physical vehicle, the usual rule applies: your own vehicle, your own bench ECUs, systems you are authorised to test.
The Diagnostic Stack: Where UDS Sits
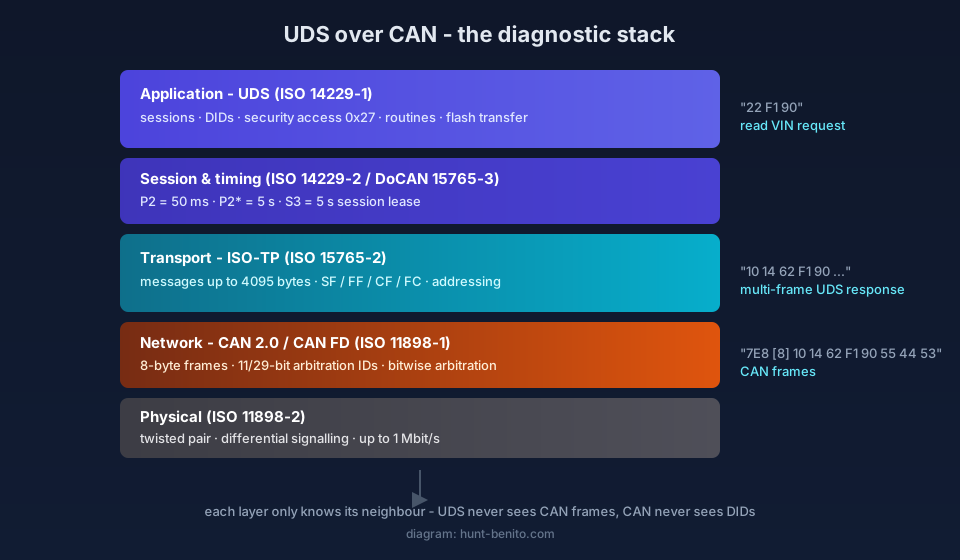
Ask “what protocol does a car’s OBD2 port speak?” and you will get several correct answers, because the port is a physical connector that several protocol generations have shared. Since the 2008 model year, the dominant answer in practice is: CAN carrying ISO-TP carrying UDS (for manufacturer diagnostics) alongside legislated OBD services.
UDS itself (ISO 14229) specifies functionality at the session, presentation and application layers - layers 5 to 7 of the OSI model. It evolved from KWP2000 (ISO 14230) over the K-Line, and was designed to be transport-agnostic: it runs over CAN (as Diagnostic over CAN, DoCAN, ISO 15765), over Ethernet (DoIP, ISO 13400), over LIN and FlexRay. In this series we use the most common deployment: UDS over CAN.
| Layer | Standard | What it provides |
|---|---|---|
| Application | ISO 14229-1 (UDS) | Services: sessions, read/write data, security access, routines, firmware transfer |
| Session / timing | ISO 14229-2 | Timing parameters (P2, P2*, S3) |
| Transport | ISO 15765-2 (ISO-TP) | Messages up to 4095 bytes over 8-byte CAN frames |
| Network | ISO 11898 (CAN 2.0 / CAN FD) | Frames, arbitration, error handling |
| Physical | ISO 11898-2 | Twisted-pair differential signalling |
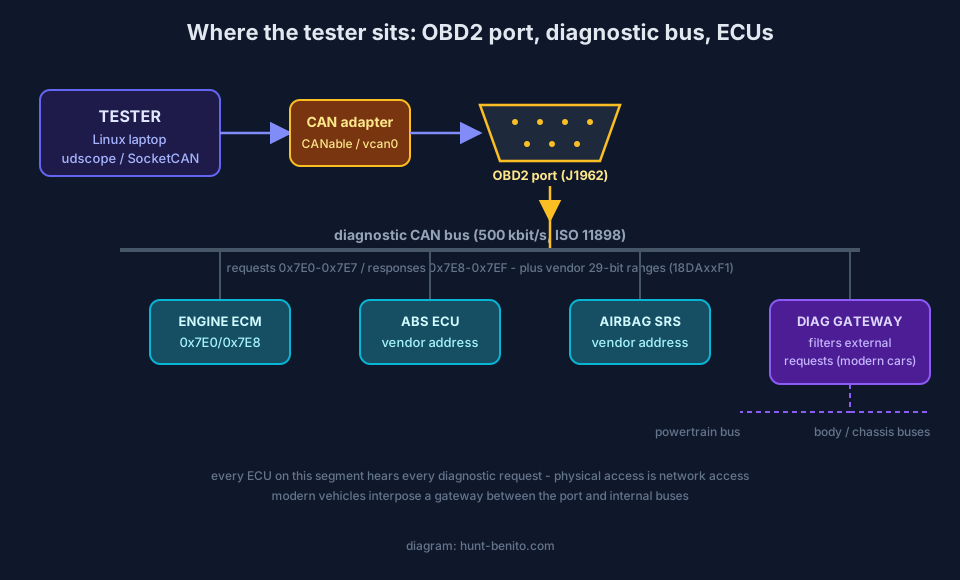
A note on OBD2 vs UDS, because the two get conflated. Legislated OBD (SAE J1979 / ISO 15031-5 in most markets) mandates a small set of emission-related services - read trouble codes, live sensor data (the famous PIDs), freeze frames - reachable at the standardized addresses described by ISO 15765-4: functional requests at 0x7DF, physical request/response pairs 0x7E0/0x7E8 through 0x7E7/0x7EF, typically at 500 kbit/s. Those addresses are reserved for emissions diagnostics on the primary diagnostic bus. Manufacturer UDS implementations use their own address pairs - very often 29-bit addresses in the 0x18DAxxF1 range, one pair per ECU - and expose far more than emissions data. When we scan later in this article, we probe the standardized slots because they are the guaranteed entry point; on a real vehicle the interesting ECUs usually live behind additional, manufacturer-specific addresses.
Physically, the whole conversation rides one twisted pair behind the 16-pin connector - and every ECU on that segment hears every diagnostic request, which is why physical access to the port is network access to the vehicle:
ISO-TP: Packing Big Messages into Small Frames
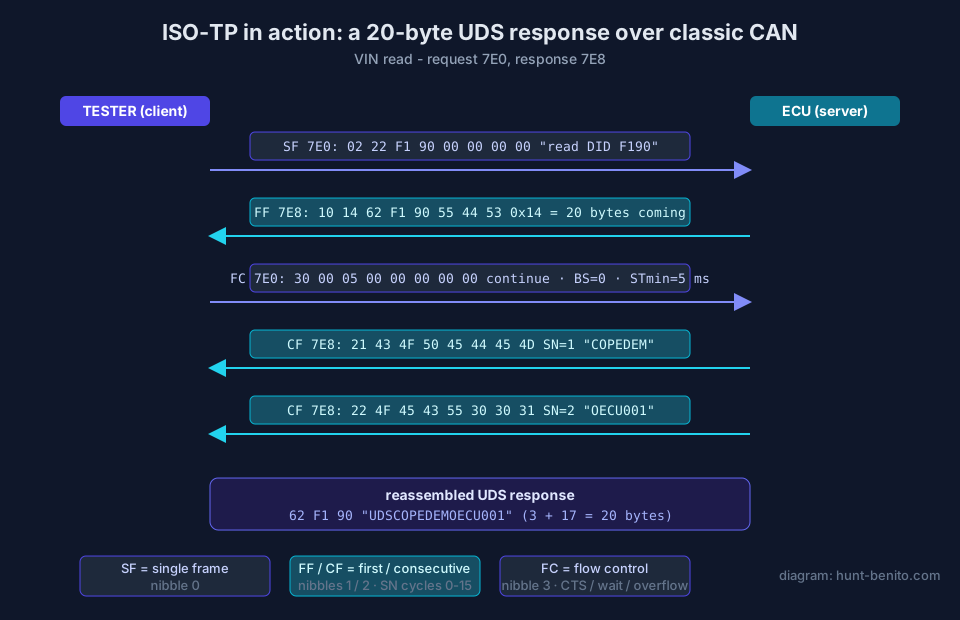
A classic CAN frame carries at most 8 data bytes. A UDS request like read the VIN produces a 3-byte request but a 20-byte response - 3 bytes of header plus the 17-character Vehicle Identification Number. ISO-TP (ISO 15765-2, “transport protocol”) is the layer that splits long messages across multiple CAN frames and reassembles them. It does so with four frame types, identified in the first nibble of each frame:
| Frame type | High nibble | Role |
|---|---|---|
| Single Frame (SF) | 0 |
Complete payload of up to 7 bytes in one CAN frame |
| First Frame (FF) | 1 |
Announces a multi-frame message: 12-bit total length, first 6 bytes |
| Consecutive Frame (CF) | 2 |
Carries the next 7 bytes; rolling sequence number (0-15) |
| Flow Control (FC) | 3 |
Receiver grants continuation: clear-to-send / wait / overflow, block size, and inter-frame separation time (STmin) |
Here is our VIN read (22 F1 90) and its response as they actually appear on the wire - the exact exchange our simulator produces later in this article:
tester -> ECU   7E0  [8]  02 22 F1 90 00 00 00 00      (SF: 2 bytes: "read DID 0xF190")
ECU    -> tester 7E8  [8]  10 14 62 F1 90 55 44 53      (FF: 0x14=20 bytes follow; "62 F1 90" + "UDS")
tester -> ECU   7E0  [8]  30 00 05 00 00 00 00 00      (FC: continue, block size 0, STmin 5 ms)
ECU    -> tester 7E8  [8]  21 43 4F 50 45 44 45 4D      (CF #1: "COPEDEM")
ECU    -> tester 7E8  [8]  22 4F 45 43 55 30 30 31      (CF #2: "OECU001")
The trailing 00 padding in the single frame is normal: some ECUs pad every frame to 8 bytes, others do not - a quirk worth remembering when you write dissectors.
ISO-TP also defines addressing modes. Normal 11-bit addressing (the 0x7E0 style pairs) is what we use throughout this article. Extended addressing adds one address byte inside each frame (effectively 6-byte single frames), and 29-bit mixed addressing carries source and target ECU addresses in the CAN ID itself - the 18DA10F1-style addresses common in modern vehicles, where 10 is the target ECU and F1 is the tester.
We will not implement ISO-TP by hand. The Python ecosystem has a mature implementation: python-can provides SocketCAN access, and can-isotp implements the transport layer. Both are battle-tested; rolling your own ISO-TP is an excellent exercise and a poor engineering decision. Our toolkit installs them as dependencies.
UDS Services: The Instruction Set of an ECU
UDS is a request/response protocol. The tester sends a request; the ECU answers with a positive response - the service identifier (SID) plus 0x40 - or a negative response 7F SID NRC explaining its refusal. The first data byte is always the SID, the second (for most services) the sub-function, whose high bit (0x80) requests positive-response suppression.
The services we exercise in this article (a small subset of the full set):
| SID | Service | Sub-function example | What it does |
|---|---|---|---|
0x10 |
DiagnosticSessionControl | 01 default, 03 extended, 02 programming |
Switches the ECU’s diagnostic session |
0x11 |
ECUReset | 01 hard reset |
Reboots the ECU |
0x14 / 0x19 |
ClearDTC / ReadDTC | - | Trouble-code housekeeping |
0x22 |
ReadDataByIdentifier | DID F190 (VIN) |
Reads a named data record |
0x23 |
ReadMemoryByAddress | address + length | Reads raw memory - privileged |
0x27 |
SecurityAccess | 11 request seed, 12 send key |
The seed-key handshake |
0x2E |
WriteDataByIdentifier | DID + data | Writes a data record - privileged |
0x31 |
RoutineControl | routine ID | Starts/stops routines (erase, self-test) |
0x34-0x37 |
RequestDownload / TransferData / … | - | Firmware flashing sequence |
0x3E |
TesterPresent | 00 |
Keeps a non-default session alive |
Every one of these can be refused, and the refusal is where much of the protocol’s character lives. The negative response codes (NRCs) you will meet constantly:
| NRC | Name | Typical meaning |
|---|---|---|
0x11 |
serviceNotSupported | ECU does not implement this SID |
0x12 |
subFunctionNotSupported | SID exists, sub-function does not |
0x13 |
incorrectMessageLengthOrInvalidFormat | Wrong request length |
0x22 |
conditionsNotCorrect | Preconditions unmet (wrong gear, engine running…) |
0x31 |
requestOutOfRange | Unknown DID / address |
0x33 |
securityAccessDenied | You need to unlock via 0x27 first |
0x35 |
invalidKey | Security access: wrong key |
0x36 |
exceededNumberOfAttempts | Too many bad keys - locked out |
0x37 |
requiredTimeDelayNotExpired | Still in the lockout penalty window |
0x78 |
responsePending | Busy - wait and keep listening |
0x7E / 0x7F |
…NotSupportedInActiveSession | Exists, but not in the session you are in |
Attention! - 0x78 responsePending is not an error. An ECU legally answers with 7F <SID> 78 and only then sends the real response, possibly repeatedly. A client that treats the first 7F as final will mis-read busy ECUs. Our client handles this by continuing to wait, up to the enhanced timeout P2*.
Reading an ECU’s answers to unsupported services is itself a reconnaissance technique: the pattern of 0x11 vs 0x12 vs 0x7F across the SID space sketches the attack surface of a unit you have never seen documentation for. The PoC repository for this article includes a service prober that does exactly this.
The Lab: virtual CAN, a virtual ECU
Every technique in this article runs without hardware. You need a Linux machine, Python 3.9+, and about five minutes of setup.
The virtual bus
If you followed the first article you may already have this. Otherwise - recent udscope versions handle it for you: every command checks for vcan0 first and, if it is missing, creates it via sudo (the password prompt explains exactly why root is needed). You can also do it explicitly with udscope setup. The manual equivalent, for the record:
$ sudo modprobe vcan
$ sudo ip link add dev vcan0 type vcan
$ sudo ip link set up vcan0
$ ip -details link show vcan0
vcan0 behaves like a real SocketCAN interface minus the physics. Everything we do - and everything the framework does - works unchanged against a real interface when you swap vcan0 for can0.
udscope
This series ships with its own open-source toolkit: udscope (“UDS + scope”). It is a Python library and CLI built on python-can and can-isotp, and - crucially for reproducible research - it includes udscope sim, an ECU simulator implementing a realistic UDS subset with honest security behaviour: session gating, security access with attempt limiting and lockout, a DID database, and raw-memory reads fenced behind authentication. It contains no vendor secrets; its seed-key algorithms are synthetic, invented to be reverse-engineered as exercises.
$ mkdir uds-lab && cd uds-lab
$ python3 -m venv .venv && source .venv/bin/activate
$ pip install git+https://github.com/Hunt-Benito/udscope
$ udscope --version
udscope 0.3.7
On Debian 12 / Ubuntu 23.04+ a bare pip install fails with error: externally-managed-environment (PEP 668) - hence the virtualenv wrapper above.
Attention! - a virtualenv activation only applies to the terminal it runs in. Every new terminal that should run udscope (or the PoC scripts later) must first re-enter the workspace and re-activate: cd uds-lab && source .venv/bin/activate. Both terminals below do exactly that.
Terminal one: the ECU
$ cd uds-lab
$ source .venv/bin/activate
$ udscope sim
udscope 0.3.7 - demo ECU on socketcan:vcan0 (requests 0x7E0, responses 0x7E8)
Level 0x11 seed-key algorithm: xor_shift_demo | Ctrl-C to stop
The simulated ECU listens at request ID 0x7E0 and answers at 0x7E8 - the first standardized pair, matching the simulator’s role as a stand-in diagnostics ECU.
Terminal two: the tester
$ cd uds-lab
$ source .venv/bin/activate
$ udscope scan
probing standard ISO 15765-4 slots on socketcan:vcan0 (please wait, up to ~4 s - one timeout per silent slot) ...
  0x7E0/0x7E8 -> responds (7e 00)
  0x7E1/0x7E9 -> no answer
  0x7E2/0x7EA -> no answer
  0x7E3/0x7EB -> no answer
  0x7E4/0x7EC -> no answer
  0x7E5/0x7ED -> no answer
  0x7E6/0x7EE -> no answer
  0x7E7/0x7EF -> no answer
1 responding address(es)

$ udscope ident
[TX] 7E0  22 f1 90
[RX] 7E8  62 f1 90 55 44 53 43 4f 50 45 44 45 4d 4f 45 43 55 30 30 31
  VIN          0xF190  UDSCOPEDEMOECU001
  Part number  0xF187  UDS-DEMO-ECU-01
  ECU ID       0xF18A  HB-DEMO-0001
  System name  0xF195  UDS01.000.000
scan sends a TesterPresent to each standardized physical address and reports who answers - a polite first-contact technique that works on real buses too (expect more responders on a real vehicle). ident reads the standard identification DIDs. Note the log lines: udscope prints every ISO-TP message in both directions by default, which is exactly the transparency you want while learning - and exactly the behaviour you will want to turn off (--quiet, in the library’s logger argument) when you script campaigns.
Sessions: The First Gate
Everything in UDS happens inside a session. The default session (0x01) is where an ECU lives its ordinary life: it answers identification reads and legislated OBD, and refuses almost everything else. The extended diagnostic session (0x03) is where diagnostic functionality wakes up; the programming session (0x02) is where firmware flashing happens. Manufacturers routinely add their own - a “engineering” or “developer” session exposing memory access and debug routines is a common (and commonly attacked) pattern.
Our simulator models this honestly with three sessions:
| Session | ID | Grants |
|---|---|---|
| Default | 0x01 |
Identification DIDs, TesterPresent |
| Extended | 0x03 |
Extended DIDs, security access, routine control |
| Developer | 0x60 (vendor-specific) |
Everything, including ReadMemoryByAddress - but only while unlocked |
One command needs introducing first: udscope shell - an interactive, stateful console (the CLI commands like session and read-did are one-shot: each invocation is a fresh process, so any non-default session is gone five seconds after the command exits, and the next command starts from scratch again). The shell holds one connection open for you and runs a background TesterPresent, so the session survives between your keystrokes. It also accepts raw UDS bytes when you want to speak directly to the metal. And it behaves like a proper Unix shell: the up-arrow recalls previous commands, history [n] prints the session log (entries persist across sessions in ~/.config/udscope/shell_history), and TAB completes commands and even their arguments - TAB after secaccess offers the registered algorithms, after keepalive the on/off switch, after read-did the demo DIDs:
$ udscope shell
udscope 0.3.7 shell - target demo on socketcan:vcan0
type 'help' for commands, raw UDS hex also works, Ctrl-D to quit
udscope> read-did 0xF22B
[TX] 7E0  22 f2 2b
[RX] 7E8  7f 22 7e
NRC 7E: sub-function not supported in active session
udscope> session 0x03
[TX] 7E0  10 03
[RX] 7E8  50 03 00 05 01 f4
session accepted: 50 03 00 05 01 f4
udscope> read-did 0xF22B
[TX] 7E0  22 f2 2b
[RX] 7E8  62 f2 2b 00 64 00 c8
0xF22B: 62 f2 2b 00 64 00 c8  |b.+.d..|
The same request refused, then granted, purely because of the session context. The trailing |…| column is the ASCII rendering of the raw bytes - for binary DIDs it is mostly noise (b.. is the 62 f2 2b response header), but for textual DIDs it turns hex directly into readable data, and udscope appends it to everything it extracts from an ECU: DID reads, DID sweeps, memory dumps. The 50 03 … positive response carries timing parameters in its payload (00 05 P2, 01 F4 P2* in units of 10 ms - 50 ms and 5 s).
The S3 timeout: sessions expire
Non-default sessions are leases, not switches. If the tester goes silent for longer than S3 (5 seconds), the ECU drops back to the default session and re-locks security access. This is why scan tools hammer 3E 00 (TesterPresent) in the background - and it is exactly what the shell’s keep-alive thread does for you.
To watch this behaviour yourself, run udscope shell (from your uds-lab workspace, with the simulator still running in the other terminal) - the transcript below is an interactive shell session, and its keepalive off command is what makes the expiry observable. Inside the shell, enter the extended session, switch the keep-alive off, stay silent for seven seconds, and ask again:
udscope> session 0x03
[TX] 7E0  10 03
[RX] 7E8  50 03 00 05 01 f4
session accepted: 50 03 00 05 01 f4
udscope> keepalive off
keep-alive off - non-default sessions now expire after S3 (5 s)
... seven seconds of silence ...
udscope> read-did 0xF22B
[TX] 7E0  22 f2 2b
[RX] 7E8  7f 22 7e
NRC 7E: sub-function not supported in active session
Back to square one, without a single new request in between. With the keep-alive on (the default), the same sequence survives indefinitely - the pinger sends a quiet 3E 00 every two seconds, well inside the lease.
The full timing vocabulary (defined in ISO 14229-2, surfaced nicely in the py-uds documentation) that governs these exchanges:
| Parameter | Value | Meaning |
|---|---|---|
| P2_server | 50 ms | Normal response window |
| P2*_server | 5000 ms | Extended window after NRC 0x78 |
| S3_server | 5000 ms | Session lease without TesterPresent |
Reading Data: DIDs, then Memory
ReadDataByIdentifier (0x22) is the workhorse. A data identifier (DID) names a typed data record: F190 the 17-byte VIN, F187 the part number, F195 the system name, and thousands of vendor-specific ones - sensor snapshots, calibration values, configuration state. When you reverse engineer an unfamiliar ECU, building a DID inventory (probing 0x22 across DID ranges and recording what answers 0x31 versus what returns data) is the standard first pass, exactly as it is for services.
DID responses are also where ISO-TP earns its keep. Our simulator’s F242 - a fake calibration summary - answers with 45 bytes of data, far beyond a single CAN frame (read it in the shell from the extended session):
udscope> read-did 0xF242
[TX] 7E0  22 f2 42
[RX] 7E8  62 f2 42 55 44 53 43 4f 50 45 2d 43 41 4c 2d 44 45 4d 4f 20 7c 20 69 64 6c 65 3d 38 35 30 72 70 6d 20 7c 20 6c 69 6d 69 74 65 72 3d 36 32 30 30
0xF242: 62 f2 42 55 44 53 43 4f 50 45 2d 43 41 4c 2d 44 45 4d 4f 20 7c 20 69 64 6c 65 3d 38 35 30 72 70 6d 20 7c 20 6c 69 6d 69 74 65 72 3d 36 32 30 30  |b.BUDSCOPE-CAL-DEMO | idle=850rpm | limiter=6200|
That is a 48-byte UDS response (3 header bytes + 45 data bytes). On the wire - a raw sniff of the same exchange - it travels exactly as the ISO-TP section described:
7E0  03 22 f2 42                 SF: read DID F242
7E8  10 30 62 f2 42 55 44 53     FF: 0x30 = 48 bytes will follow
7E0  30 08 05                    FC: continue (block size 8, STmin 5 ms)
7E8  21 43 4f 50 45 2d 43 41     CF #1
7E8  22 4c 2d 44 45 4d 4f 20     CF #2
7E8  23 7c 20 69 64 6c 65 3d     CF #3
7E8  24 38 35 30 72 70 6d 20     CF #4
7E8  25 7c 20 6c 69 6d 69 74     CF #5
7E8  26 65 72 3d 36 32 30 30     CF #6
One first frame, six consecutive frames, reassembled by the transport layer before the client ever sees it - read-did, the shell and sweep-dids all handle multi-frame responses transparently, which is precisely why we let can-isotp do this job instead of writing it ourselves.
ReadMemoryByAddress (0x23) is a different animal. It does not read records; it reads raw memory at an explicit address and length. On a real ECU in a developer session this is a firmware-dumping primitive - the subject of a later article in this series - and no honest ECU leaves it unguarded. In our simulator it is doubly gated: wrong session gives you NRC 0x7E, right session without authentication gives you NRC 0x33 securityAccessDenied. Reaching it requires walking the full chain - extended session, unlock, developer session - which we do at the end of this article.
The response encoding is worth a look because it contains a subtle parsing trap. The request carries an address-and-length format identifier: the high nibble says how many bytes express the address, the low nibble the length. Our example uses 0x42 - 4-byte address, 2-byte length, the standard encoding:
23 42 00 c0 de 00 00 20     ReadMemoryByAddress, addr=0x00C0DE00, len=0x0020
63 00 c0 de 00 <32 bytes>   response echoes the address, then the data
Attention! - that format byte is what the standard mandates, but it is not what every real ECU speaks. Plenty of units in the field - especially the previous hardware generation - answer to vendor dialects of 0x23: some drop the format byte entirely, some use two-, three- or four-byte addresses, and some carry the length in a single byte. When you move from the simulator to real hardware, expect the memory-read encoding to be the first thing you have to discover empirically; assume nothing beyond the SID. Our toolkit speaks the standard form (with selectable address width); the dialect zoo is handled in the firmware-dumping article later in this series.
The response echoes the address bytes before the data. A parser that assumes a fixed header will read the tail of the address as payload - an off-by-N that has bitten more than one homebrew tooling project.
Security Access 0x27: The Seed-Key Handshake
And so we arrive at the gate the previous article promised: security access. Restricted services - memory reads and writes, configuration changes, flashing - are fenced behind an authentication state. 0x27 implements a classic challenge-response:
- The tester requests a seed (odd sub-function, e.g.
27 11) - The ECU replies with a random value (or an all-zeros / zero-length seed if already unlocked)
- The tester computes a key from the seed using a secret, ECU-side algorithm
- The tester sends the key (even sub-function,
27 12 <key>) - The ECU runs the same algorithm on its seed; match → unlock, mismatch →
NRC 0x35
The algorithm is the secret. Not a standard - ISO 14229 deliberately says nothing about how keys are derived. Every vendor (often every ECU family, sometimes every firmware generation) rolls its own, historically preferring cheap 8/16/32-bit constructions - XOR chains, rotates, table lookups, LFSRs - that fit microcontrollers without crypto accelerators. Those implementation choices are the subject of the next article, where we reverse engineer one out of firmware. For this article, the simulator’s level 0x11 is guarded by a synthetic rotate/XOR/ADD chain (xor_shift_demo) - simple enough to crack by inspection in a disassembler, realistic enough to exercise the full protocol mechanics.
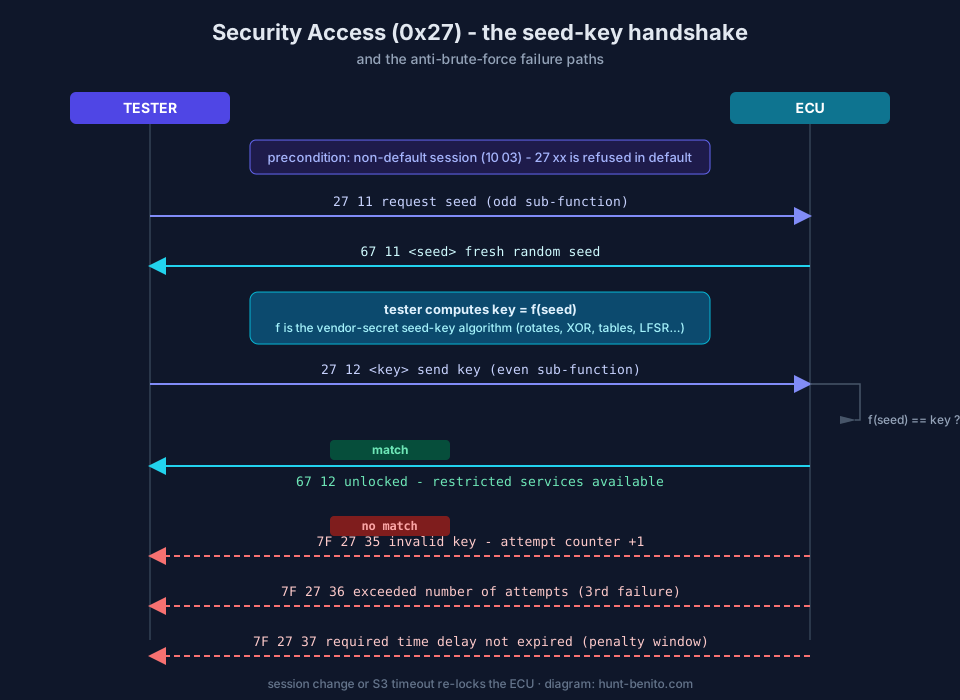
The handshake, with the anti-brute-force machinery visible:
$ udscope secaccess --algo table_mix_demo
[TX] 7E0  10 03
[RX] 7E8  50 03 00 05 01 f4
[TX] 7E0  27 11
[RX] 7E8  67 11 47 39 93 a2
[TX] 7E0  27 12 18 13 6c 10
[RX] 7E8  7f 27 35
security access DENIED: negative response to SECURITY_ACCESS: NRC 0x35 (invalid key)
That was one wrong key (table_mix_demo is not the algorithm this ECU uses, so every key it produces is wrong). Try that three times, then once more:
attempt 1:  27 12 18 13 6c 10  ->  7F 27 35   (invalid key)
attempt 2:  27 12 4a 13 24 c6  ->  7F 27 35   (invalid key)
attempt 3:  27 12 46 13 71 ca  ->  7F 27 36   (exceeded number of attempts - counter tripped)
attempt 4:  27 11 ...          ->  7F 27 37   (required time delay not expired - 10 s penalty)
NRC 0x36 announces the attempt counter has tripped; 0x37 enforces a delay (our simulator: 10 seconds; real ECUs commonly 10 s to several minutes) before another seed will even be issued - and in the simulator, as on many real units, the attempt counter survives session changes; only a full ECU reset clears it. Combined with 4-byte seeds, online brute force through the diagnostic interface is usually hopeless - seconds per attempt, lockouts, and 2^32 keys. The practical attack surface has never been the seed space; it is the algorithm: if the seed→key function can be recovered (from a firmware dump, from a leaked dealer tool, from a protocol capture where keys are observable), the handshake collapses into an arithmetic exercise - which is precisely why seed-key algorithm reverse engineering is both the industry’s open secret and our next article.
Meanwhile, with the right algorithm in the registry, the handshake is one command:
$ udscope secaccess --algo xor_shift_demo
[TX] 7E0  10 03
[RX] 7E8  50 03 00 05 01 f4
[TX] 7E0  27 11
[RX] 7E8  67 11 ab f8 b4 b8
[TX] 7E0  27 12 a7 39 8a cf
[RX] 7E8  67 12
security access GRANTED: 67 12
Watch the traffic log: 67 11 + 4 seed bytes out, 27 12 + 4 computed key bytes back, 67 12 positive - unlocked. Attention! - note the seeds differ between the two runs above. A fresh seed is issued per request; replaying a captured key gets you nothing on a competent ECU.
The full chain
Unlocking is a capability, not a destination. The simulator’s developer session - the one that serves 0x23 memory reads - checks both boxes: session 0x60 and unlocked. The complete walk, exactly as udscope demo performs it:
$ udscope demo
== udscope guided demo against socketcan:vcan0 ==
[1] tester present
    7e 00
[2] identification
    VIN: UDSCOPEDEMOECU001
[3] switch to extended session 0x03
    50 03 00 05 01 f4
[4] security access level 0x11 with 'xor_shift_demo'
    67 12  -> unlocked
[5] enter developer session 0x60
    50 60 00 05 01 f4
[6] read memory by address 0x00C0DE00, 32 bytes
    UDSCOPE DEMO FIRMWARE v0.2 | THI
demo complete.
Default session → identify → extended session → seed-key unlock → elevated session → raw memory. That five-step shape - with vendor variations in session IDs, security levels, and algorithms - is the same on real hardware, and it is the skeleton every diagnostic attack in the literature hangs from:
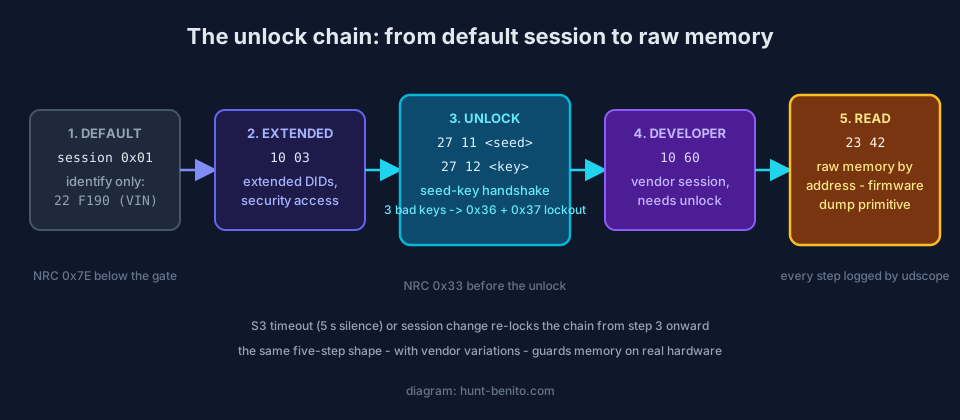
(Full transcript, log lines and all, is what udscope demo prints; the block above condenses each step to its result line.)
The PoC: udscope as a Library
The CLI is a convenience; the library is the point. udscope is organised in five small modules - transport (ISO-TP links), uds (client + protocol constants), security (the seed→key registry), simulator (the demo ECU), and cli - and everything the commands above do is scriptable:
https://github.com/Hunt-Benito/getting-deeper-with-uds-automotive-diagnostics-on-linux
from udscope.transport import IsotpLink
from udscope.uds import Session, UdsClient
from udscope import security

link = IsotpLink(0x7E0, 0x7E8, channel="vcan0")
link.start()
client = UdsClient(link)

print(client.read_vin())                          # default session is enough
client.set_session(Session.EXTENDED)              # 10 03
client.security_access(0x11,                      # 27 11 ... 27 12 <key>
                       lambda seed: security.xor_shift_demo(seed, 0x11))
client.set_session(Session.DEVELOPER)             # 10 60 - now permitted
blob = client.read_by_address(0x00C0DE00, 32)     # 23 42 ...
link.stop()
The PoC repository for this article contains ready-to-run scripts exercising each stage - including a service prober that walks the whole SID space and classifies responses (0x11 / 0x12 / 0x7E / 0x7F), producing a per-ECU attack-surface map, and a lockout demonstrator that trips 0x36/0x37 deliberately. Clone it, start udscope sim in a second terminal, and run them in order:
$ cd uds-lab && source .venv/bin/activate
$ git clone https://github.com/Hunt-Benito/getting-deeper-with-uds-automotive-diagnostics-on-linux.git
$ cd getting-deeper-with-uds-automotive-diagnostics-on-linux
$ python 01_scan.py            # find responders on the bus
$ python 02_ident.py           # identification DIDs
$ python 03_sessions.py        # session gating + S3 timeout behaviour
$ python 04_service_probe.py   # SID-space enumeration (attack surface map)
$ python 05_secaccess.py       # wrong key -> 0x35 x2 -> 0x36 -> 0x37 -> wait -> success
$ python 06_chain.py           # the full unlock chain, ending in a memory read
The same campaigns ship as built-in commands - udscope sweep-dids runs a DID inventory over any range you give it, and udscope dump chunks 0x23 reads over an address range into a binary file, both with a background TesterPresent keeping the session alive past the S3 timeout.
Adding your own seed-key algorithm
When the next article teaches you to pull a seed-key algorithm out of firmware, the registry is where it lands - one function, four bytes in, four bytes out:
from udscope.security import SeedKeyAlgorithm, register

register(SeedKeyAlgorithm(
    name="recovered_from_abc123_fw",
    seed_len=4, key_len=4,
    fn=lambda seed, level: recovered_key_function(seed),
    description="recovered from firmware part ABC123 v1.2",
    origin="your research notes",
))
Registered algorithms are immediately available to udscope secaccess --algo recovered_from_abc123_fw and to client.security_access(). Keep the origin honest - future-you will thank present-you when the registry grows.
Why This Matters: Attack Surface in Context
It is fair to ask what an attacker can actually reach. The honest answer has evolved:
- Physical access used to be everything. The OBD2 port is a captive audience: any device on it speaks to every ECU on that bus segment. The IOActive research that put automotive diagnostics on the security map (Miller & Valasek, 2014) worked exactly at this layer - CAN traffic recorded through the diagnostic interface, UDS-style services exercised against real engine and body controllers, and security-access weaknesses documented against production units. The physical-proximity requirement was the main mitigating factor.
- Standard weaknesses are harder to patch than bugs. Trend Micro’s DIMVA 2017 paper (with Politecnico di Milano and Linklayer) demonstrated a denial-of-service that lives in the design of the diagnostic standards - the element exploited is the protocol’s own arbitration and error handling, not an implementation mistake, and ICS-CERT disseminated it as alert ICS-ALERT-17-209-01. It remains a canonical example of why “the standard says so” is not a security argument.
- Modern architectures moved the goalposts, not the goal. Current vehicles interpose a diagnostic gateway between the OBD2 port and internal buses: external testers get legislated OBD and carefully filtered access, while manufacturer tooling authenticates through to the deep functionality. Meanwhile UDS itself is migrating to DoIP over Ethernet, and regulatory pressure (UN R155/156, ISO/SAE 21434) forces tamper-proofing, secure boot, and authenticated diagnostics. The primitives you learned in this article did not disappear; they moved behind additional layers - and every one of those layers still terminates in a session, a security level, and a seed-key handshake somewhere.
For the defender, the take-aways are symmetrical: gate your diagnostic gateway aggressively; treat “vendor-specific session + weak seed-key algorithm” as a finding class, not a quirk; and log - or at least rate-limit - 0x27 failures, because three 0x35s in a row is someone learning your algorithm’s shape.
For the researcher, the message of this article is that the UDS layer is legible. Sessions, DIDs, NRCs and the seed-key exchange are all observable, well-specified mechanics - and every gate you can observe, you can study.
What’s Next
The next article in this series delivers the second half of the promise from the CAN fundamentals piece: reverse engineering a seed-key algorithm out of ECU firmware. We will take a firmware image, locate the security-access handler, lift the algorithm from disassembly into Python, register it in udscope, and watch 27 12 come back 67 12 - against a practice firmware target built for the series, using the same method you would apply to a unit you own. Once you can compute keys, the remaining articles - firmware dumping and beyond - follow naturally.
SOURCES
ISO 14229-1 Unified diagnostic services (UDS) - Part 1: Application layer (current edition ISO 14229-1:2026): https://www.iso.org/standard/87962.html
ISO 15765-2:2024 Road vehicles - Diagnostic communication over Controller Area Network (DoCAN) - Part 2: Transport protocol and network layer services: https://www.iso.org/standard/84211.html
ISO 15765-4:2021 Road vehicles - DoCAN - Part 4: Requirements for emissions-related systems: https://www.iso.org/standard/78384.html
Bosch CAN Specification 2.0: https://www.bosch-semiconductors.com/media/oth/can2_0.pdf
SAE J1979 OBD2 Scan Tool API: https://www.sae.org/standards/content/j1979_201702/
Wikipedia - Unified Diagnostic Services (service and NRC reference): https://en.wikipedia.org/wiki/Unified_Diagnostic_Services
Wikipedia - ISO 15765-2 (transport framing reference): https://en.wikipedia.org/wiki/ISO_15765-2
py-uds documentation (timing parameters and service knowledge base): https://uds.readthedocs.io/en/stable/pages/knowledge_base/service.html
Miller, C. & Valasek, C. - Adventures in Automotive Networks and Control Units (IOActive, 2014): https://ioactive.com/pdfs/IOActive_Adventures_in_Automotive_Networks_and_Control_Units.pdf
Palanca, A., Evenchick, E., Maggi, F. & Zanero, S. - A Vulnerability in Modern Automotive Standards and How We Exploited It (Trend Micro, 2017): https://documents.trendmicro.com/assets/A-Vulnerability-in-Modern-Automotive-Standards-and-How-We-Exploited-It.pdf
CISA ICS Alert ICS-ALERT-17-209-01 - CAN Bus Standard Vulnerability: https://www.cisa.gov/news-events/ics-alerts/ICS-ALERT-17-209-01
python-can: https://github.com/hardbyte/python-can
can-isotp (python ISO-TP): https://github.com/pylessard/python-can-isotp
udscope (this series’ toolkit): https://github.com/Hunt-Benito/udscope
Previous article in this series - Getting Started with CAN Bus Reverse Engineering on Linux: https://www.hunt-benito.com/blog/getting-started-with-can-bus-reverse-engineering-on-linux/
SocketCAN documentation (Linux kernel): https://www.kernel.org/doc/html/latest/networking/can.html